Building a Product Management System using React 18 and ASP.NET Core 6
Web API
Follow along as I build a Product Management application using ASP.NET Core 6
Minimal Web API for the backend and React 18 for the frontend. Along the way, you will see how to create a database using entity framework migrations, how to test your api using httprepl and how to consume the API using a react frontend application.
Section 1 - Project Setup
Authored by Emem Isaac. Published: May 9, 2022
In this part, we will setup the React and Web API projects.
Technology Stack
Frontend: React 18 with TypeScript
Backend: ASP.NET Core 6 with C#
Database: SQLite
Assumptions
You have some basic knowledge of JavaScript, TypeScript, and C#
You can play around with ASP.NET Core and React
Installations
To follow along, please download and install the following tools - if
you do not have already have them.
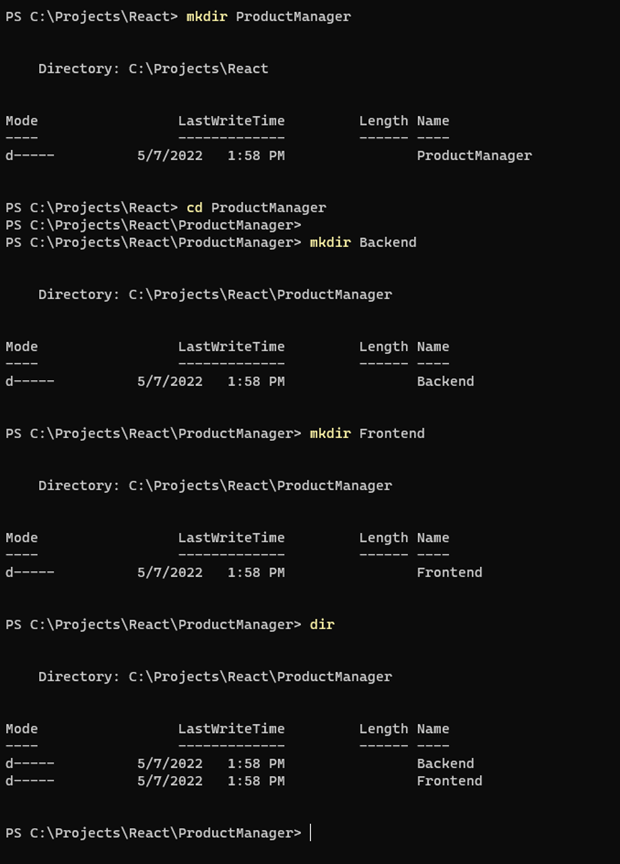
Create a folder for this project. I am calling mine ProductManager.
Inside that folder, create two subfolders namely Backend and Frontend
Figure 1: This image illustrates the creation of the desired folder
structure using terminal commands
React Project Initialization
Now that our folders are ready, let's bootstrap the frontend
application. Assuming your terminal is open and you are at the
directory in the project root directory, change into the Frontend
folder and run the command
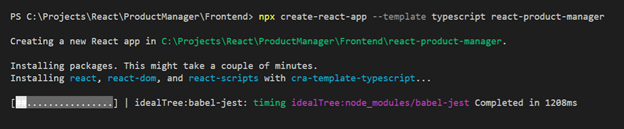
If all goes well you should have a a brand new react app in a new
directory - react-product-manager. I encountered the following error when I first tried this "You are running ‘create-react-app’ x.y.z which is behind the latest release (a.b.c)". I resolved it as follows:
npm uninstall -g create-react-app
npx clear-npx-cache
Figure 2: Illustrates a create-react-app script at work
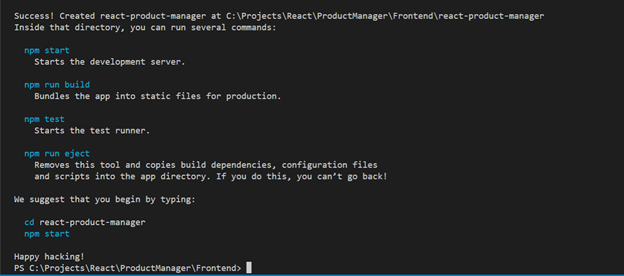
Figure 3: React app ready for customization
Now that our react application is ready, we will install some additional libraries.
To do so, change directory into react-product-manager and execute the following command to install them.
npm i axios bootstrap react-query react-router-dom @types/react-query @types/react-router-dom
Since we will be using bootstrap for styling, we will s add it to our Index.tsx. Open Index.tsx file and in the top of the file add a reference to bootstrap as follows import “bootstrap/dist/css/bootstrap.min.css”;
We just initialized our frontend and backend projects. In the next section, we will focus on adding features to products management application backend.
Section 2 - Adding Features to the ASP.NET Core WebApi Backend
Authored by Emem Isaac. Published: May 11, 2022
Tasks
Add EntityFramework for Persistence
Create the Product & Picture Entities
Create the Product Data Transfer Object
Create our first migration
Create a REST endpoint that serves a list of products
If you already have the tool installed, it might be a good idea to update it.
dotnet tool update --global dotnet-ef
Since we will be using SQLite for persistence, we will install the EntityFramework package for SQLite - Microsoft.EntityFrameworkCore.Sqlite. The general syntax for installing a package is dotnet add package name.of.package. To install our package, change directory into your MinimalWebApi directory. Mine is at C:\Projects\React\ProductManager\Backend\MinimalWebApi, then run this command at the terminal.
In a proper application, I would create a separate class library project to contain our Entities. But let's keep things simple and just use a separate folder. We'll call it Entities.
We want to manage the name, description and price of every product in our store. We also want to store pictures of each product. Here is the structure we have come up with. Please read the comments in the class file to understand the design decisions
We base the Product class off a base class - Entity. This is the base type for all Entities in our application domain. It contains properties which every entity should have. This is what the Entity class looks like
We use a Picture class to model a real world product picture
The classes above are our Entities and will eventually contain properties that the outside world
may not need to know about. For this reason and because we want to be able to evolve our Entities without
forcing all consumers of our API to also change, we will create data transfer classes with similar names.
Our entities will be transformed into their Data Transfer alter egos before getting shipped out by the API.
The reverse occurs when API clients need to post information to the API.
Task 2.3 - Create the Product Data Transfer Objects (DTO)
Let's create a folder called Models for our DTO classes. I dislike suffixing my classes with DTO. I chose instead to distinguish my Entities from my DTO's
by using different namespaces. My Entities live in the Entities namespace whereas the DTO's live in
the Models namespace. See our Product and Picture DTO's below. You'll notice that they are much simpler and contain fewer properties - only what matters to them.
Task 2.4 - Create our first migration
EntityFramework migrations are class files that contain instructions for creating database objects
like tables and constraints based on the relationships between Entities. To generate a migration,
you must first have a database context class. Let's create ours.
I added the seeder class so that we can have some sample data in our database
To create our first migration, we will use the dotnet ef command. Here is the full syntax
dotnet ef migrations add initial
Common mistakes with the above command include not adding s to migration or putting add before migrations.
Note that the last word initial is the name we want for this migration. The migration name is up to you,
just make it short and descriptive. If everything went well, you should have a new folder in the your
application called Migrations. I'll share a screenshot of my project folder for your reference
Figure 5: The folders and their contents after getting this far in Section 2
Now that our migration is ready, let's use it to create our database. The command for that is:
dotnet ef database update
You should see output similar to that in the image below:
Figure 6: The tail end output of a successful run of the initial migration
Task 2.5 - Create a REST endpoint that serves a list of products
Our final task in this section is the /products REST endpoint.
We will place a repository between our application and the database context.
This will help with automated testing, will protect our app from any future changes in the DbContext API's and will limit the changes we need to make if we decide to switch persistence provider.
Our repository will have just two methods for now. A List method that supports pagination and an Add method. We will also create a matching interface for it.
Recall that we generated this project using the minimal web api project template.
So our endpoint will be created right within the Program.cs file initially.
It will take in an instance of the IProductsRepository, using it to return a list of Products from the database. Here is the code for the Program.cs.
The key changes are:
We register the ApplicationDbContext so that it can be injected into our ProductsRepository
We register the IProductsRepository mapping it to it's implementation ProductsRepository
We add the products list route
To see if our API is working as expected, we will use httprepl dotnet CLI tool. Installing the tool can be done as follows
dotnet tool install -g Microsoft.dotnet-httprepl
If you already have it installed, update it
dotnet tool update --global httprepl
Start the api which you can do with dotnet run in the api project folder command prompt
Figure 6: Running the api with the dotnet run command
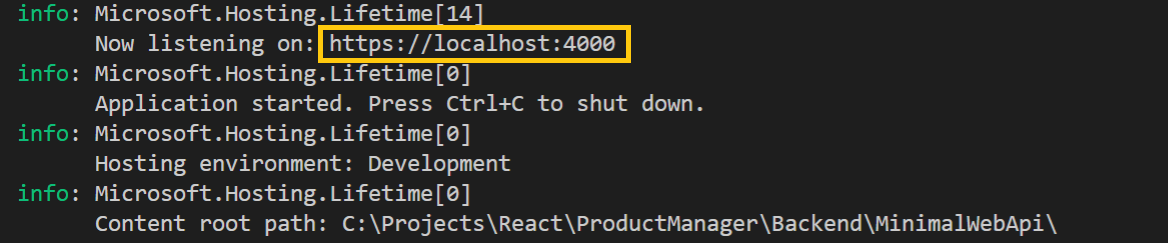
You should see output similar to that below. I have highlighted the application URL as we will need it for testing
Figure 8: A running dotnet web app
Fire up a new command prompt and there type the command httprepl to launch our api tester.
You will see output: (Disconnected). This confirms the installation is successful and the tool is ready.
Now attach it to your application URL with the connect command: connect https://localhost:4000
remember to replace the 4000 with your URL port number.
Figure 9: Starting httprepl
You should notice the prompt change into your URL.
To view the list of endpoints in your app type dir
At this point you should have just one endpoint "products [GET]".
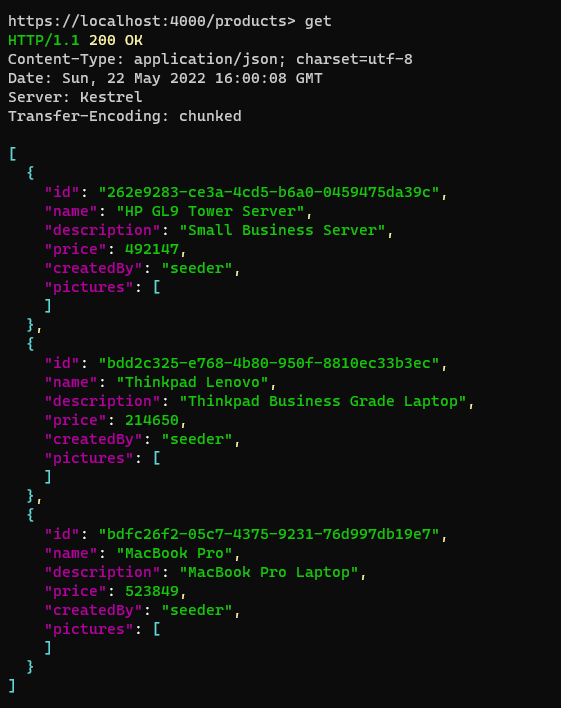
To see this endpoints output, visit it with the change directory command: cd products and type it's method "GET". If you added any seed data like I did it should show.
Figure 10: Browsing the API using httpreplFigure 11: Products REST endpoint output
Summary
In section 2, we went through the process of installing the tools we need for working with EntityFramework.
Thereafter we created the entities for our application domain, we also created their corresponding data transfer objects.
Next we created a DbContext class where we defined the entities we want to persist.
We rounded up the section by creating and applying our first migration and implementing an endpoint that outputs a collection of products.
In the next section, we will build a user interface that displays our product list in react. Stay tuned!
Section 3 - Products List Screen in React
Authored by Emem Isaac. Published: May 23, 2022
Tasks
Create the Product type
Create a config file
Create the Fetch Products Hook
Create the Products List Component
Modify the Backend's CORS configuration
Create a Request Status Component
Task 3.1 - Create the Product type
It will have exactly the same fields like the Models.Product class in the backend.
Change into the react-product-manager directory we created back in the
React Project Initialization section of this article.
You can use the command code . to open that folder in Visual Studio Code. Locate the src directory then create a folder called types inside.
In the types folder, create two files Product.ts and Picture.ts. Your code should match the example below
Task 3.2 - Create a config file
At the moment all we need the config file to do is hold a reference to our backend's URL. Create a file config.js in the src directory.
Remember to use your own URL as yours may differ.
Task 3.3 - Create the Fetch Products Hook
Coming soon
Task 3.4 - Create the Products List Component
Coming soon
Task 3.5 - Modify the Backend's CORS configuration